- Download the application code from this GitHub repository.
- Open your terminal and go to the project’s root directory.
- Run the
npm installcommand to install every dependency from the project’spackage.jsonfile. - Create a new .env file, as we explain later in this article.
- Follow other instructions in this article to set up Expo, install the mobile app, and run the application on your device.
Building a Simple React Native Web View App
In this section, we’re building a new project using an existing React Native app codebase as a starting point. That codebase is part of Using the TomTom Maps Web SDK in a React Native Web View App, which is an article previously published here on the TomTom developer blog. First, we download or clone the Git repository above, open the code in our IDE of choice, and runnpm install to download all the current packages and dependencies.
Then, we need to obtain an API key to access TomTom’s services. Start by registering as a developer on the TomTom developer portal. You get thousands of daily requests for free, even for commercial applications, then you can simply pay as your app grows in popularity.
Your developer account provides you with a sample API key to access all other TomTom maps and APIs in the future.
Once we get the TomTom API key, we’ll want to store it somewhere in the project to use it in the React Native app. Let’s create a new .env file containing our TomTom key:
tomtom-maps-react-native-web.env
TOMTOM_DEVELOPER_KEY=<Your_API_Key>
.gitgnore file in your project’s root directory and include a new entry with the .env file. This action ensures you won’t share your secret TomTom developer key accidentally.
					#ignore the .env file
.env
To use the TomTom developer key in our code, we’ll need the inline-dotenv plugin to load our .env file and read the value we set. We install the following packages:
					npm install babel-plugin-inline-dotenv
npm i metro-react-native-babel-preset --save-dev
babel.config.js file to include the inline-dotenv plugin:
					module.exports = function(api) {
  api.cache(true);
  return {
    presets: ['babel-preset-expo'],
    plugins: ['inline-dotenv']
  };
};
template.js file and replace the map declaration to include the TomTom developer key from the .env file. We also change the zoom property value to 15:
					let map = tt.map({
  key: '${process.env.TOMTOM_DEVELOPER_KEY}',
  container: 'map',
  center: [-121.913, 37.361],
  zoom: 15
});
App.js file and change the following section on the CSS to adjust the map scaling:
					  map: {
    transform: [{ scale: 3 }],
Also, we replace the buttons section with this:
					buttons: {
  flexDirection: 'row',
  height: '10%',
  backgroundColor: '#fff',
  color: '#000',
  alignItems: 'center',
  justifyContent: 'center',
  marginTop: 12,
  marginBottom: 0
},
Setting Up Expo Go
Before running the project, we’ll need to work on a React Native app. The fastest way to get up and running with React Native is to use the Expo Go mobile client app on our iOS or Android device. Also, we’ll have to use the Expo CLI command line so we can interact with the Expo tools and run and debug applications. The Expo CLI initializes and serves the React Native project to the Expo Go mobile app from the desktop project.
When we start Expo with Expo CLI, it gives a QR code. Scanning this code serves our mobile app with all the project assets needed for the React Native application to run on our device. The Expo Go mobile app can quickly scan the Expo QR code to run and test our app on iPhone or Android.
To set up our React Native app using the Expo CLI, we install the expo-cli package globally:
npm install -g expo-cli
Then, we install the Expo Go app on our smartphones.
Now, we run the React Native app:
npm start
We’ll see that Expo is serving the application through the localhost address at some port number, such as:
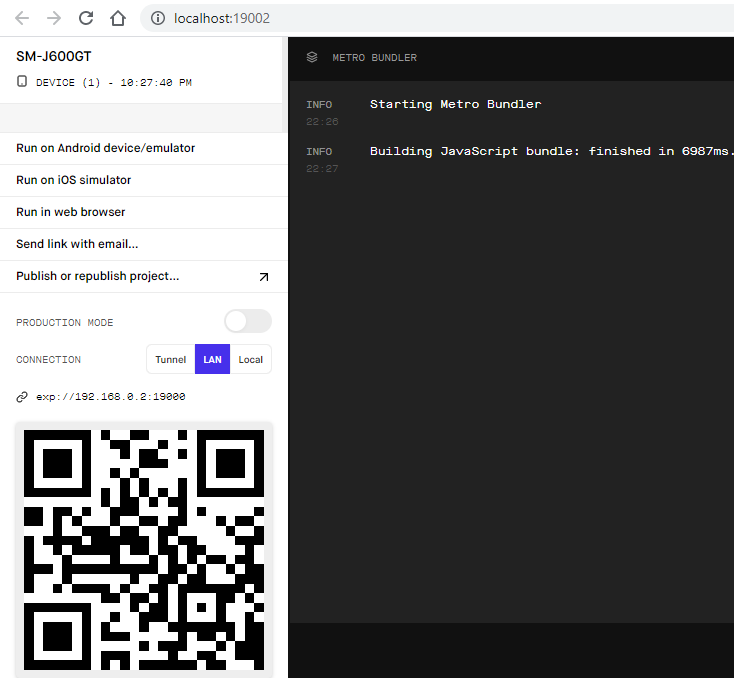
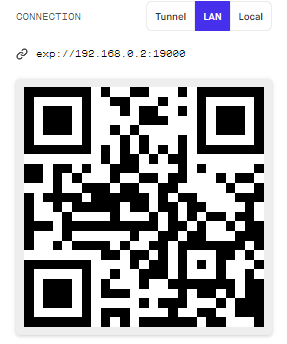
Next, we open Expo Go on our smartphone and scan the QR code:
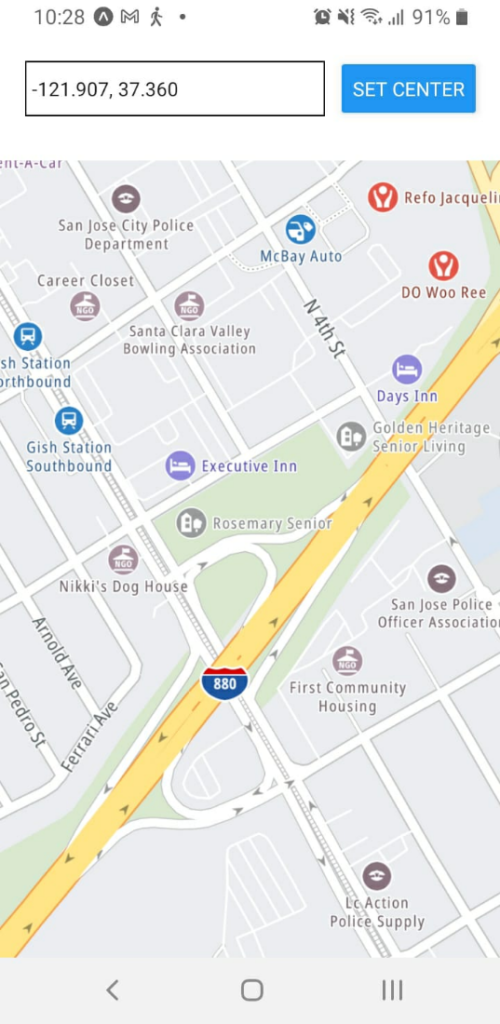
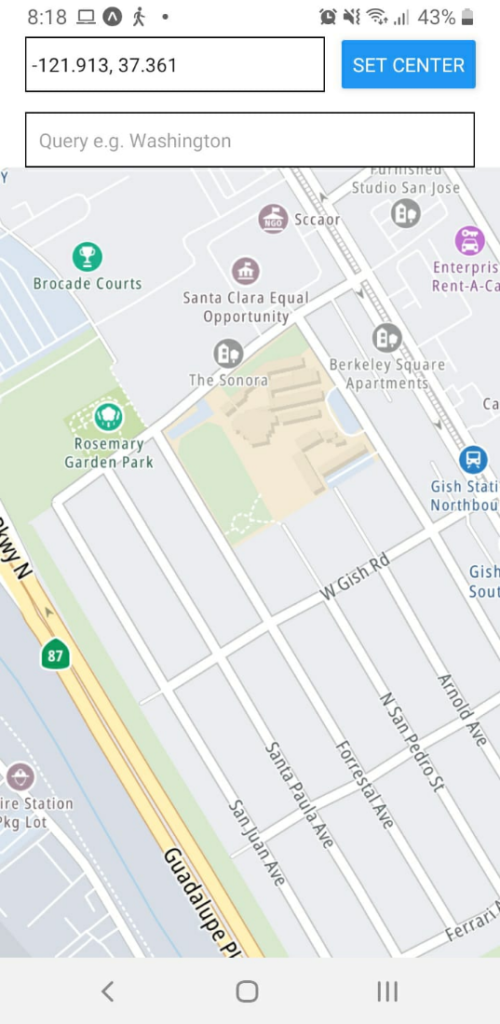
The Expo Go mobile app starts downloading the JavaScript bundle and other assets. We’ll finally see the React Native app showing TomTom maps:
Creating the Suggestions UI Component
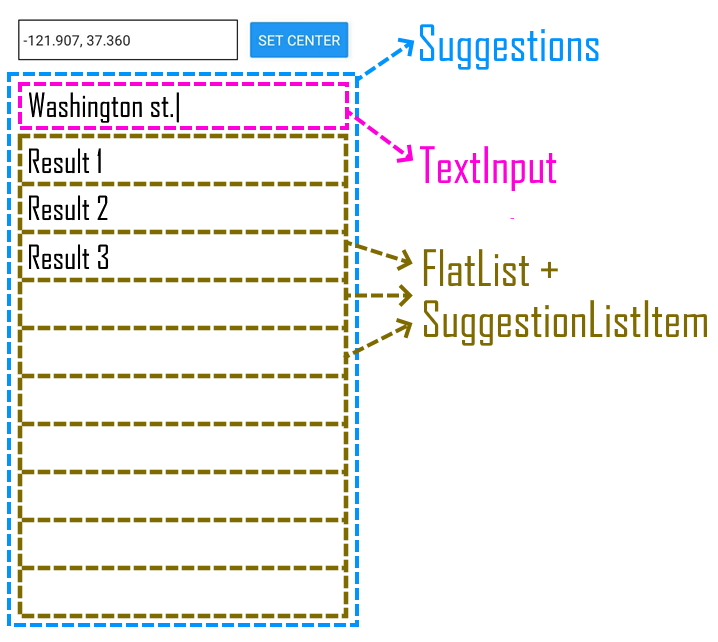
We’ll need to create custom visual elements to add location autocomplete and suggestions to the current mapping app with the desired UI experience. Let’s see which new UI components we need:
- Suggestions: a custom component to hold a new React Native TextInput (where the user will type the search text) and a React Native FlatList (to show search results). While the user is using the map, this list stays hidden. When the user starts searching for locations, the list temporarily covers the map.
- SuggestionListItem: a custom component that displays a formatted item for each location suggestion that the search returns. When the user selects one location, it triggers an event so that the TomTom map updates to display that location’s coordinates.
Suggestions.js file containing a React Native component:
tomtom-maps-react-native-webSuggestions.js
					import React from 'react';
import { StyleSheet, View, TextInput, FlatList } from 'react-native';

export function Suggestions(props) {
  let searchInputRef = undefined;

  const handleOnPressItem = (item, event) => {
    this.searchInputRef.blur()
    props.onPressItem(item, event)
  }

  return (<View style={styles.suggestionListContainer}>
    <TextInput
      ref={(ref) => {this.searchInputRef = ref}}
      style={styles.searchInput}
      placeholder={props.placeholder}
      onChangeText={props.handleSearchTextChange}>
    </TextInput>
    {props.showList && <FlatList style={styles.searchList} keyExtractor={(item, index) => index.toString()} keyboardShouldPersistTaps="always" initialNumToRender={5} data={props.suggestionListData} renderItem={({
      item
    }) => <SuggestionListItem onPressItem={handleOnPressItem} item={item}></SuggestionListItem>} />}
  </View>);
}
- The
Suggestionfunction represents the topmost React Native component that holds everything new we’re building in our app’s UI. - The
TextInputcomponent is where the user types in their search text. - The
FlatListrenders the list of suggestions. - The
handleOnPressItemfunction implements the code that responds to the press gesture on theSuggestionListItem. It removes the focus from the search - The
SuggestionListItemis how the FlatList component renders each of the suggestions from thesuggestionListData. We’ll implement theSuggestionListItemlater in this article. - The
handleSearchTextChangeprop is how we pass theonChangeTextevent forward so our app can invoke the TomTom Search API.
searchButtons, searchInput, suggestionListContainer, and searchList). We need to provide those styles in a new code snippet with the StyleSheet.create function. In React Native, StyleSheet is an abstraction similar to CSS StyleSheets for our app view:
					const styles = StyleSheet.create({
  searchButtons: {
    flexDirection: 'row',
    height: '10%',
    backgroundColor: '#fff',
    color: '#000',
    alignItems: 'center',
    justifyContent: 'center',
    marginTop: 0,
    paddingLeft: 18,
    paddingRight: 18
  },
  searchInput: {
    height: 40,
    paddingLeft: 10,
    paddingRight: 10,
    borderWidth: 1
  },
  suggestionListContainer: {
    width: "90%",
    marginLeft: "5%",
  },
  searchList: {
    width: "95%",
    marginTop: 10,
  }
});
Using TomTom Search API
At this point, we already have a new React Native component that allows our users to type in location names and display the results. We still need to implement the code to get the user’s input and look for suggestions.
In this application, let’s implement Fuzzy Search. It’s a service within the TomTom Search API that provides a RESTful API for searching addresses and points of interest. Fuzzy Search offers a powerful programmable interface and a flexible combination of options. We can use it in our application with a minimal set of parameters, like below:
https://api.tomtom.com/search/2/search/QUERY.json?key=<Your_API_Key>
The QUERY parameter is the search text that the user typed, which can be part of the name of an address or a point of interest.
This sequence diagram represents what we’re working to achieve:
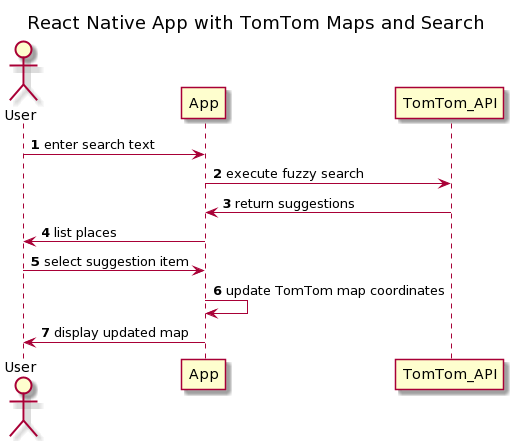
We still need to access this endpoint from our React Native app code. We can use Axios, a promise-based HTTP client, to execute requests, handle responses, transform responses, and integrate the returned data into our React application.
To use the Axios HTTP client, we first install the Axios package from npm:
npm install axios
expo-location package, which allows our app to read geolocation information from the device:
expo install expo-location
useEffect method from the React package:
import { useState, useEffect } from 'react';
Suggestions custom component, and the expo-location package:
					import axios from 'axios';
import { Suggestions } from './Suggestions';
import * as Location from 'expo-location';
getCurrentPositionAsync method from the Expo’s Location object. We add these lines to get the current location using useEffect:
					export default function App() {
  const [location, setLocation] = useState(null);

  useEffect(() => {
    (async () => {
      let { status } = await Location.requestForegroundPermissionsAsync();
      if (status !== 'granted')
        return;

      let location = await Location.getCurrentPositionAsync({});
      setLocation(location);
    })();
  }, []);
App() function:
const tomtomKey = process.env.TOMTOM_DEVELOPER_KEY;
Then, we add these declarations:
					  let [placeholder, setPlaceholder] = useState('Query e.g. Washington');
  let [showList, setShowList] = useState(false);
  let [suggestionListData, setSuggestionListData] = useState([])
  const run = `true;`;
showList boolean variable that toggles the list visibility (only to cover the map below when necessary).
Then, we add this function to handle the change of search text:
					  const handleSearchTextChange = changedSearchText => {
    if (!changedSearchText || changedSearchText.length < 5)
      return;

    let baseUrl = `https://api.tomtom.com/search/2/search/${changedSearchText}.json?`;
    let searchUrl = baseUrl + `key=${tomtomKey}`;

    if (location) {
      searchUrl = searchUrl + `&lon=${location.coords.longitude}`;
      searchUrl = searchUrl + `&lat=${location.coords.latitude}`;
    }

    axios
      .get(searchUrl)
      .then(response => {
        let addresses = response.data.results.map(v => {
          let parts = v.address.freeformAddress.split(',');
          return {
            p1: parts.length > 0 ? parts[0] : null,
            p2: parts.length > 1 ? parts[1] : null,
            p3: parts.length > 2 ? parts[2] : null,
            address: v.address.freeformAddress,
            lat: v.position.lat,
            lon: v.position.lon
          };
        });

        setSuggestionListData(addresses);
        setShowList(true);
      })
      .catch(function (error) {
        if (error.response) {
          // Request made and server responded
          console.log(error.response.data);
          console.log(error.response.status);
          console.log(error.response.headers);
        } else if (error.request) {
          // The request was made but no response was received
          console.log(error.request);
        } else {
          // Something happened in setting up the request that triggered an Error
          console.log('Error', error.message);
        }
      })
  }
suggestionListData array. Finally, it shows the suggestions list on the screen.
Now, we add the following function to handle the event when the user clicks an address. This function hides the suggestion list and centers the map on the selected location.
					  const onPressItem = (item) => {
    setPlaceholder(item.address);
    setMapCenter(`${item.lat}, ${item.lon}`)
    setShowList(false);
    webRef.injectJavaScript(`map.setCenter([${parseFloat(item.lon)},
      ${parseFloat(item.lat)}])`);
  }
Suggestion component to App.js right before the <WebView> tag. Note that we’re wiring the component’s events and properties to the functions and variables in our code.
					      <Suggestions
        placeholder={placeholder}
        showList={showList}
        suggestionListData={suggestionListData}
        onPressItem={onPressItem}
        handleSearchTextChange={handleSearchTextChange}>
      </Suggestions>
SuggestionListItems.js file at the project’s root to hold a new React Native component for the list items:
tomtom-maps-react-native-webSuggestionListItems.js
SuggestionListItem functional component that renders each suggestion item inside the FlatList of the Suggestions component.
					import React from 'react';
import { StyleSheet, View, Text, TouchableOpacity } from 'react-native';
import { FontAwesomeIcon } from '@fortawesome/react-native-fontawesome';
import { faMapMarkerAlt } from '@fortawesome/free-solid-svg-icons';

export function SuggestionListItem(props) {
  return (<TouchableOpacity onPress={() => props.onPressItem(props.item)}>
    <View style={styles.searchListItem}>
      <View style={styles.searchListItemIcon}>
        <FontAwesomeIcon icon={faMapMarkerAlt} />
      </View>
      <View>
        <Text style={styles.searchListItemTitle}>{props.item.p1}</Text>
        {props.item.p2 && props.item.p3 ? <Text>{props.item.p2} {props.item.p3}</Text> : null}
        {props.item.p2 && !props.item.p3 ? <Text>{props.item.p2}</Text> : null}
      </View>
    </View>
  </TouchableOpacity>);
}

const styles = StyleSheet.create({
  searchListItemIcon: {
    marginLeft: 10,
    marginRight: 10,
    marginTop: 10
  },
  searchListItem: {
    marginTop: 5,
    marginBottom: 5,
    flexDirection: "row"
  },
  searchListItemTitle: {
    fontWeight: 'bold'
  }
});
Finally, we install the Font Awesome icon set toolkit so we can display the location icon beside each location item:
					npm i --save @fortawesome/fontawesome-svg-core
npm i --save @fortawesome/free-solid-svg-icons
npm i --save @fortawesome/react-native-fontawesome
Running the App
Now, we rerun the app to see the Suggestions component in action.
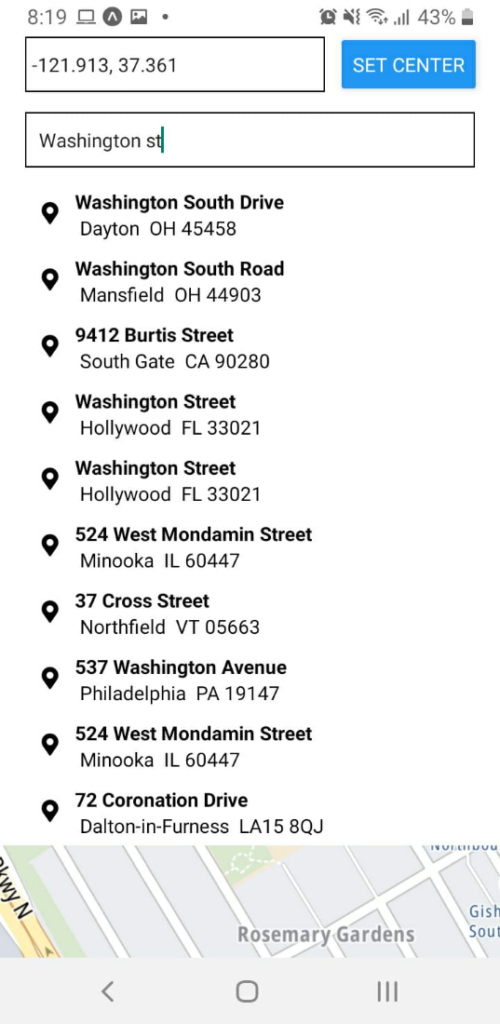
Start typing an address, a company name, or some point of interest. Note that the new component displays the results list, partially hiding the underlying map:
When the user selects one of the suggestions, the component tells our app to center the map on that location’s coordinates.
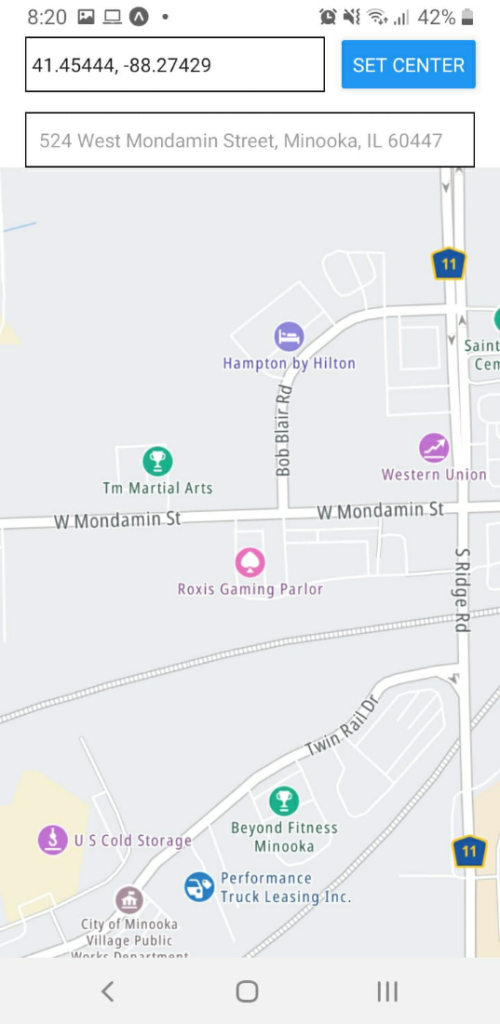
Our map app now helps our users search for and find addresses and points of interest. They can quickly locate what they need and see its position on the map.
Next Steps
TomTom strives to provide a great developer experience. As we’ve seen, TomTom mapping APIs and SDKs for React Native components combine powerful functions with simplicity, making them the ideal choice for modern web developers who like to get things done quickly on both Android and iOS.
Explore the TomTom Developer Portal and register for your free API key to get started on your next awesome mapping project. You can see for yourself how TomTom Maps and the JavaScript SDK help you deliver a remarkable user experience.
To learn more of what you can do with TomTom, check out our other tutorials on React and the Search API:
- Using the TomTom Maps Web SDK in a React Native Web View App
- Adding TomTom Maps to a Modern React App
- Autocomplete and Suggestions with the Search API
If you’re interested in developing expert technical content that performs, let’s have a conversation today.