Search

Securing Secrets in Kubernetes

Conjur Kubernetes Authentication: A Hands-On Demonstration

Secrets – or privileged credentials that act as “keys”– are essential in Kubernetes environments. Kubernetes pods and their component containers need secrets to access protected resources like databases, SSH servers, and HTTPS services. Establishing a strong non-human identity is critical in securing secrets and the access they provide.

Conjur: An Open-Source Solution

Conjur is an open-source, centralized platform that enables organizations to consistently enforce security policies for non-human identities for secrets management and access control. Conjur helps you implement best practices for secrets management, including:

Conjur is part of the Conjur Open Source Suite (OSS) collection of software components and tools.

In the sections that follow, we’ll set up a Conjur cluster along with some application pods to demonstrate and explore Conjur’s authentication mechanisms for Kubernetes.

Take it for a Spin

Let’s first set up a running Kubernetes/Conjur “sandbox” that we can use to explore some of the concepts behind Conjur and Conjur Kubernetes Authentication.

To follow along, you will need one of the following:

  • MacOS laptop running Docker Desktop
  • Linux workstation or VM running Docker

You don’t have to have a Kubernetes cluster available before running the demo. We’ll use some automated scripts that are available here that use Kubernetes-in-Docker (KinD) to set up a local Kubernetes cluster, and then deploy Conjur and some applications in that local cluster.

Step 1: Install Prerequisite Client Utilities

The Conjur OSS demo scripts make use of several client binary utilities that will need to be installed on your system, if they’re not already available:

Step 2: Clone the Conjur OSS Helm Chart Repository

Run the following to clone the Conjur OSS Helm Chart GitHub repository:

				
					mkdir -p ~/cyberark
cd ~/cyberark
git clone https://github.com/cyberark/conjur-oss-helm-chart
cd conjur-oss-helm-chart


Step 3: Run the demo scripts

Run the following commands to deploy the Conjur Kubernetes-in-Docker demo:

				
					cd examples/kubernetes-in-docker
./start


That’s all there is to it!

If everything is successful, you should see the following verification of Conjur secrets being retrieved by the application instances:

				
					++++++++++++++++++++++++++++++++++++++++++++++++++++
Deployment of Conjur and demo applications is complete!
++++++++++++++++++++++++++++++++++++++++++++++++++++


Exploring the Setup

You should now have a local Kubernetes-in-Docker (KinD) cluster with the following Namespace/Pod configuration:

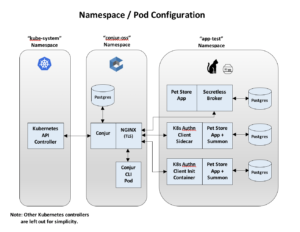
You can use kubectl to view the pods in the conjur-oss and app-test namespaces:

				
					$ kubectl get pods -n conjur-oss
NAME                          READY   STATUS    RESTARTS   AGE
conjur-cli-6d895db49d-g4t8k   1/1Running017m
conjur-oss-547867fdf8-bqgvz   2/2Running021m
conjur-oss-postgres-01/1Running021m

$ kubectl get pods -n app-test
NAME                                       READY   STATUS    RESTARTS   AGE
secretless-pg-01/1Running014m
summon-init-pg-01/1Running014m
summon-sidecar-pg-01/1Running014m
test-app-secretless-989486bc7-62blg2/2Running014m
test-app-summon-init-7f9c8f4598-qmgl8      1/1Running014m
test-app-summon-sidecar-5dc96cd94c-hwvx5   2/2Running014m


In summary, you should now have a local Kubernetes-in-Docker (KinD) cluster that is running the following deployments for the Conjur demo:

Namespace DeploymentDescription/Containers
conjur-oss conjur-cliConjur CLI pod. This makes it easy to run Conjur CLI commands to configure your Conjur cluster (instructions are available here)
 conjur-oss

Conjur OSS pod with 2 containers:

conjur-oss-postgresPostgresql pod, provides persistent database functionality for the Conjur server
app-test secretless-pgPostgresql backend for the ‘test-app-secretless’ deployment
 summon-init-pgPostgresql backend for the ‘test-app-summon-init’ deployment
 summon-sidecar-pgPostgresql backend for the ‘test-app-summon-sidecar’ deployment
 test-app-secretlessPet Store app with Secretless Broker sidecar container to manage the application’s database connection
 test-app-summon-init

Application pod with 2 containers:

 test-app-summon-sidecar

Application pod with 2 containers:


Application Secrets

In this example, each ‘Pet Store’ application requires its own set of credentials secrets to access its backend database. Each instance uses its attached authenticator broker/client sidecar/init container to authenticate with Conjur and retrieve its private database credentials.


The Secretless Broker

One of the Pet Store deployments includes a Secretless Broker sidecar container. By connecting to the SecretlessBroker rather than connecting to the backend database directly, the Pet Store application can access database information (i.e. “pets”) without knowing database connection credentials. For each connection request from the Pet Store application, the Secretless Broker will do the following:

  • Authenticate with Conjur
  • Retrieve a Conjur access token
  • Retrieve backend database credentials from Conjur using that access token
  • Inject credentials into the connection request, and forward it to the database

Once the connection is made, Secretless Broker seamlessly streams the connection between the client and the service.


The Kubernetes Authenticator Client

The Kubernetes authenticator client uses certificate-based mutual TLS to authenticate an application and retrieve a Conjur access token, which it stores in shared pod memory. The access token can then be used by Summon or one of the available Conjur APIs to retrieve application secrets from Conjur.

The client can run as either a sidecar or init container:

MethodDescription
SidecarAs a sidecar container, the Kubernetes Authenticator Client runs as a continuous process, generating a refreshed token value every 6 minutes. An access token has a time-to-live of 8 minutes.
InitAs an init container, the Kubernetes authenticator provides the application with one, initial access token and then it exits. The provided access token expires after 8 minutes.


How it Works: The Conjur Authentication Workflow

The following sequence diagram depicts the Conjur authentication workflow for the Kubernetes Authentication Client.

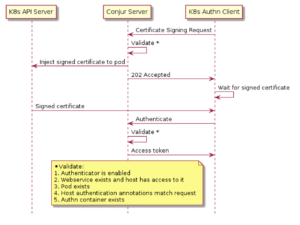
The Certificate Signing Request (CSR)

The Conjur authentication process uses mutual TLS protocol to ensure that both parties can verify their peers. The mutual TLS protocol requires that the client has a client certificate that has been signed by a trusted CA (in this case, Conjur itself).

The Kubernetes Authentication Client begins the authentication process by sending a Certificate Signing Request (CSR) to Conjur. The CSR includes application identity that the application pod would like to use to authenticate, as well as information about the application pod that is making the request.

Verifying the Client: Conjur Application Identity

In this demo, the application identity that is provided in the CSR includes Kubernetes-native attributes of the application instance:

  • Kubernetes Namespace name
  • Kubernetes ServiceAccount name
  • Kubernetes Deployment name

The Conjur server incorporates a Conjur Kubernetes Authenticator (also referred to as ‘authn-k8s’) plugin that examines this application identity, and compares it against the Kubernetes API to verify the identity of the client.

Certificate Injection

If verification of the client succeeds, the client certificate is injected into the application pod using the Kubernetes API. Since this injection is done out-of-band (rather than returning it directly in the request response), the Conjur authenticator ensures that the client certificate is delivered to the pod that matches the metadata in the CSR.

The certificate expires and is renewed automatically on a regular basis to reduce the chances of a malicious third party being able to use a compromised certificate to assume the application pod’s identity.

Establishing Mutual TLS and Requesting and Access Token

After receiving a client certificate, the authentication client uses it to establish a mutual TLS connection with Conjur and requests a short-lived access token. The access token is written to shared pod memory so that it can be used with Summon to retrieve secrets from Conjur. The token is short-lived to reduce the possibility that it can be used by a malicious third party if it is somehow compromised.

Retrieve Secrets

The application can now use the access token to retrieve secrets with Summon. Summon runs the application as a sub-process and provides secret values in environment variables.

Security Policy as Code

This demo illustrates how Conjur supports the concept of “Security Policy as Code.” Conjur security policies are defined by creating human-readable, declarative, YAML manifest files that articulate such things as:

  • Human users who can access Conjur through the CLI, or the API
  • Applications that can authenticate to Conjur programmatically and access data
  • Variables that represent the secrets that will be stored in Conjur
  • Webservices that can provide services to Conjur

Policy manifest files are loaded into Conjur using the Client CLI or REST API. Conjur interprets and transforms your policy statements into definitive database records. You can safely re-apply policy any number of times.

A policy file is declarative, meaning that the rules become data in the database; it is not executable code. Therefore, loading a policy file does not have any effect other than to create and update the role-based access control model in your Conjur appliance. These properties make policy files automation-friendly.

Policy files can be checked into source control, and a review process can be established for managing changes to policy files just like other controlled files.

The demo scripts generate security policy manifests that can be viewed from your local host


Viewing Rendered Conjur-OSS Security Policy

The demo scripts render several security policy manifest files that define application-specific Conjur security policy. These manifest files are loaded into the Conjur server to configure which applications are permitted to access which secrets from Conjur. (Typically, the loading of security policy is done by a security administrator.)

These files can be viewed in the temp/kubernetes-conjur-demo/policy/generated subdirectory:

  • app-access.yml
  • generated/app-test.app-identity.yml
  • generated/app-test.cluster-authn-svc.yml
  • generated/app-test.project-authn.yml

Example: Conjur Host and Application Identity Definition

As an example, let’s look at the entry in generated/app-test.project-authn.yml that defines the Conjur application identity for the test-app-secretless application that is deployed by the demo scripts:

				
					- !host
  id: test-app-secretless
  annotations:
    authn-k8s/namespace: app-test
    authn-k8s/service-account: test-app-secretless
    authn-k8s/deployment: test-app-secretless
    authn-k8s/authentication-container-name: secretless
    kubernetes: "true"


In this host definition, the annotations specify that in order for the Secretless Broker to successfully authenticate the test-app-secretless deployment, all of the following need to be true:

  • Application is running in the app-test namespace
  • Application is using the test-app-secretless ServiceAccount
  • Application’s deployment name is test-app-secretless
  • Application pod contains a container named secretless

Another Example: Security Policy for Applications Secrets Access

As another example, we can take a look at the security policy that is used to grant privileges to secrets that are specific to the Pet Store application instance that incorporates a Secretless Broker sidecar container. This security policy can be found in the app-access.yml file, and looks like this:

				
					- !policy
  id: test-secretless-app-db
  owner: !group secrets_admin
  annotations:
    description: This policy contains the creds to access the secretless app DB
  body:- &secretless-variables
      - !variable password
      - !variable url
      - !variable port
      - !variable host
      - !variable username

    - !permit
      role: !layer /test-app
      privileges: [ read, execute ]
      resources: *secretless-variables


This security policy defines several Conjur variables that are used for managing application-specific database credentials for the Pet Store instance that incorporates a Secretless Broker sidecar container. This policy is owned by the ‘secrets_admin’ group and read/execute access is granted to any entities in the ‘test-app’ layer


Role-Based Access Control (RBAC)

The security policy examples described in the previous section illustrate how Conjur enables organizations to use Role-Based Access Control (RBAC) in managing security policies and secrets access. RBAC is the definition of organizational roles such as administrators, supervisors, users with full access, and users with read-only access. Organizational users are assigned a role based on the access they require to do their job. The same concept can be applied on non-human identities and be leveraged to provide access to applications based on predefined RBAC policies.

The RBAC usually assigns access rights to a group and not to a specific user. In the case of non-human identities, a group of hosts (a non-human entity), is called a “layer” and can be assigned access rights the same way groups can. This approach reduces the overhead to manage users or non-humans, eliminates access errors, and facilitates auditing.


Cleaning Up

When you are done with the Kubernetes Conjur Demo, you can clean up the demo simply by deleting the Kubernetes-in-Docker cluster:

				
					kind delete cluster
				
			
Conclusion

I hope that you enjoyed this hands-on demonstration of Conjur and Conjur Kubernetes Authentication.

With this demonstration, we saw that Conjur is an open-source, centralized platform that can be used to consistently enforce security policies for non-human identities for secrets management and access control.

We saw how Conjur uses the Conjur Kubernetes Authenticator plugin to authenticate applications using Conjur Kubernetes application identity.

We also saw some of the authentication clients that can be integrated with applications in order to facilitate Conjur authentication and secrets access, including:

  • Secretless Broker
  • Kubernetes Authentication Client (either as a sidecar or init container)

Finally, this demonstration illustrated just some of the security policy best practices and concepts that are facilitated by Conjur including:

  • Strong authentication, including use of:
    – Certificate Signing Requests
    – Mutual TLS
    – Conjur Kubernetes application identity
  • Least privilege
  • Security policy as code
  • Role-based access control (RBAC)

Next Steps for Securing Kubernetes Secrets

Check out our new hosted interactive tutorials for securing CI/CD pipelinessecuring Ansible automation, and securing Kubernetes secrets to learn more. Also, sign up to the DevSecOps newsletter to get the latest open source community news, tutorials, blogs, and product news. Finally, join the CyberArk Commons Community to connect with me and other developers, see you there!

Facebook
Twitter
LinkedIn
Reddit
Email

POST INFORMATION

If you work in a tech space and aren’t sure if we cover you, hit the button below to get in touch with us. Tell us a little about your content goals or your project, and we’ll reach back within 2 business days. 

Share via
Copy link
Powered by Social Snap